Who said mirror photography was a thing of the past? Far from being just a trend for impromptu selfies, this type of photography has become a powerful creative tool for those who know how to harness its potential. From symmetrical compositions to reflections that play with perception, mirror photos offer endless possibilities for expressing style, technique, and visual storytelling. Whether you’re a professional photographer, a content creator, or simply someone looking to experiment with more interesting self portraits, this article is for you.
In this post, we share 10 original mirror photography ideas designed not only to elevate your portfolio but also to stand out on social media and capture viewers’ attention. We go beyond the typical selfie: here you’ll find inspiration for working with lighting, poses, angles, framing, and even post processing. So, if you want to turn a simple reflection into a striking image, keep reading. Mirrors may not lie, but you can make them tell a great story.
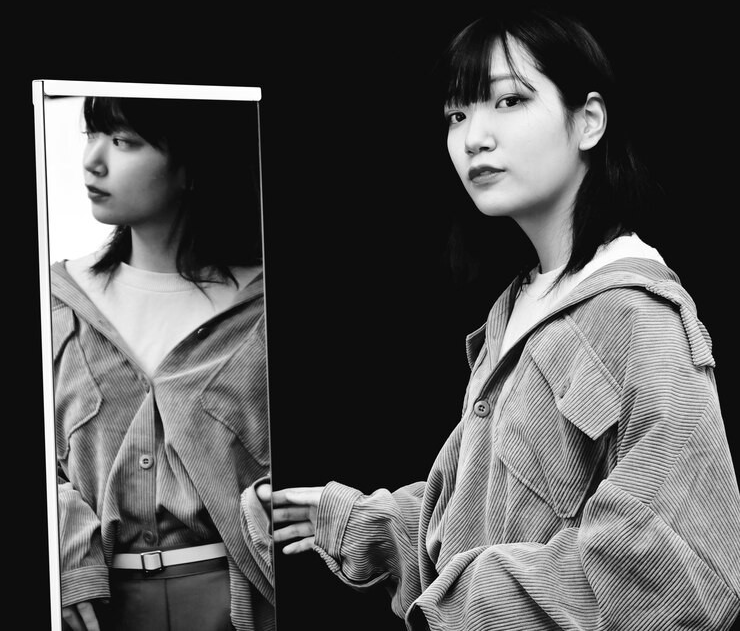
1. Use reflection to create perfect symmetry


Symmetry is one of the most visually compelling compositional tools in photography, and mirrors are a natural ally for achieving it. By placing your subject perfectly at the center of the frame with the mirror precisely aligned, you can create an image where both sides reflect each other as a single, cohesive unit. This type of photography is not only striking visually but also conveys balance, harmony, and attention to detail. To achieve it, it’s essential to position the camera carefully, ensuring it is perfectly straight and level with the mirror.
Work with the cleanest possible background so nothing distracts from the symmetry. Plain walls, closed doors, or minimalist settings work best. If the subject is surrounded by clutter, the symmetry loses strength and the visual impact diminishes. You can also use elements like door frames, architectural lines, or symmetrical furniture to reinforce the composition. Remember that in photography, what’s left out of the frame matters as much as what’s included: every element should contribute to the image.
Lighting is key. Soft, even light helps highlight the symmetry without creating harsh shadows that draw attention away. With natural light, try to have it coming from the sides to evenly illuminate both the subject and their reflection. Artificial lighting can also be used, with two light sources placed on either side to maintain balanced exposure. Avoid direct light on the mirror, as this can produce unwanted glare or reflections.
Finally, don’t underestimate the role of post production. In programs like Lightroom or Photoshop, subtle adjustments can help align axes, correct lens distortion, or balance color between both halves of the image. For an even more precise effect, you could digitally duplicate one side of the reflection to create perfect symmetry, though this becomes a more artistic intervention. As a photographer, you have the freedom to decide how far to push the technique. With a simple idea like this, you can produce images that convey professionalism, creativity, and a strong mastery of visual composition.

2. Play with the natural light coming through a window


Natural light is one of the most versatile and beautiful tools you can use when photographing in front of a mirror. It not only enhances textures and skin tones softly but also creates an organic atmosphere that’s difficult to replicate with artificial lighting. Placing a mirror near a window allows you to experiment with the direction, intensity, and color temperature of the light throughout the day. The key is to observe how the light falls on the subject’s face or body and how it reflects in the mirror to create a harmonious, immersive image.
The golden hour—at sunrise or sunset—is ideal if you’re aiming for warm, soft light that bathes the subject in golden tones. This light not only flatters features but also adds an emotional, cinematic quality to the scene. For a cleaner, more natural aesthetic, indirect morning or midday light works beautifully, as long as it doesn’t enter the frame directly. In these situations, you can diffuse the light using sheer curtains or a white sheet, creating a highly effective DIY softbox.
A professional tip is to position the mirror diagonally relative to the window so that the light hits the subject from the side. This adds volume to the face or body, creating soft shadows that enhance depth and definition. If the mirror faces the window directly, the light may appear flat and lacking contrast. However, frontal light can be useful if you want a more uniform image or to focus on details like makeup, accessories, or clothing. Everything depends on the concept you want to convey.
Don’t underestimate the power of secondary reflections. Natural light often bounces off light colored walls or reflective surfaces, helping fill in shadows without additional equipment. Use these bounced rays to illuminate specific areas of your composition. In post processing, subtle adjustments to exposure, color temperature, and contrast can enhance the natural effect without sacrificing realism. Working with natural light in mirror photography not only improves visual quality but also deepens your connection with the environment, training you to observe more carefully, a sensitivity that inevitably shows in every image you capture.

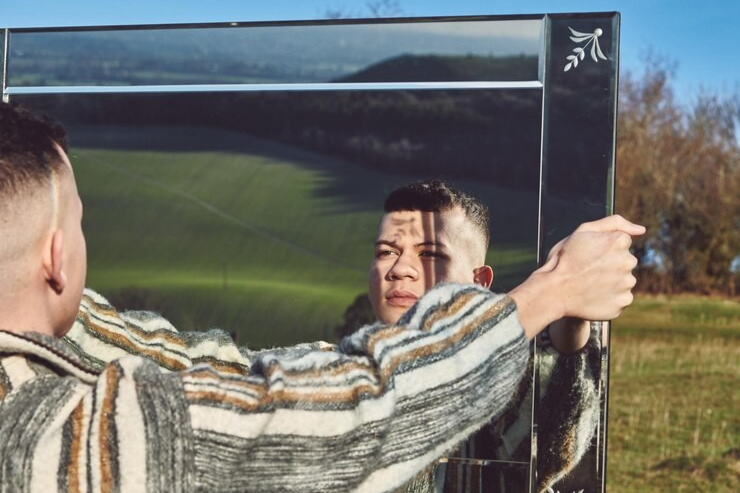
3. Incorporate elements from the surroundings into the composition


One of the biggest mistakes in mirror photography is focusing solely on the subject and forgetting the context. The environment reflected in the mirror can be just as expressive as the person in the image. By including elements of the surroundings, you can tell a richer story, add visual depth, and transform a simple selfie into a photograph with intention. Think of plants, books, artwork, lights, furniture, textures, anything that helps build atmosphere and reinforces the identity of the subject or the space.
The key is conscious composition. Before taking the shot, carefully observe everything that appears in the mirror’s reflection. Does it contribute to the narrative? Does it align with the style of image you want to create? Often, a slight adjustment of the mirror or a small change in angle can completely transform the frame. For example, a hanging lamp can create interesting lines, a plant can add color and naturalness, and a vintage chair can introduce an artistic or nostalgic touch. Treat the space like a stage, where every object has a role to play.
In small spaces, you can use the mirror as a “window” to expand the perception of the room. Position it to reflect another part of the space, such as a textured wall or a window with flowing curtains. This not only gives a sense of openness but also introduces movement and dynamism into the image. You can even play with contrasts between what’s inside and outside the mirror, like an organized reflection against a controlled chaos in the real environment, which can create an engaging visual story.
In post production, enhance the environmental elements that add visual value. Boost the saturation of key colors, apply a subtle vignette to focus attention, or adjust the white balance to maintain harmony between the real and reflected spaces. Including the surroundings in your composition is an excellent way to demonstrate visual control and creativity. As a photographer, these details elevate your work by showing your ability to see beyond the subject and craft complete, intentional images with a distinct identity.

4. Take the picture from unusual angles


One of the most effective ways to break away from traditional mirror photography is to experiment with unconventional angles. Instead of positioning the camera directly in front of the mirror, try tilting it, raising it, lowering it, or even placing it in extreme positions that alter the perspective of the reflection. This not only adds dynamism to the image but also sparks curiosity in the viewer. Unexpected angles create visual tension, and in photography, tension almost always translates into interest.
For instance, you can place the camera below mirror level and shoot upward to elongate the lines of the body or convey a sense of power and presence. Alternatively, shooting from above can create a more intimate or delicate feeling. With a full length mirror, try tilting it slightly backward or to the side so the reflection shifts within the frame. This can produce intriguing effects where the subject appears to exist in another dimension or space.
Additionally, angled shots allow you to play with diagonal lines, a powerful compositional tool. Diagonals introduce movement and guide the viewer’s eye through the image. You can use them to create visual intersections between the subject’s body, the edge of the mirror, and other elements like frames, doors, or walls. Just make sure not to sacrifice visual balance: an unusual angle shouldn’t mean chaotic composition. The key is to experiment with purpose.
In post production, you can emphasize the angle by adjusting the framing, using asymmetric cropping, or fine tuning perspective to enhance the visual effect. Corrections can also help if a key element ended up slightly off level or distorted by the lens. Using unconventional angles in mirror photography isn’t just a matter of style, it’s a way to inject your personal vision as a photographer, reinterpreting a familiar scene from a unique perspective. In a world flooded with images, that is exactly what makes a photo stand out.
5. Use two mirrors to create infinite depth
A visually striking—and often underrated—technique is using two facing mirrors to create an infinite repetition effect. This setup produces a tunnel of reflections that conveys endless depth, immediately capturing the viewer’s attention. It’s a creative way to play with perception, space, and composition, offering photographers a chance to stand out both technically and visually.
The basic setup involves placing two mirrors opposite each other, with the subject positioned between them. The camera can be placed behind one of the mirrors (if it’s partially reflective or if you can hide cleverly) or at a side angle to capture the repeated reflections. The more perfectly aligned the mirrors, the cleaner the reflection tunnel will be. You can control how many repetitions appear by adjusting the distance between the mirrors and the angle of the shot, allowing for compositions that range from subtle to dramatically cinematic, almost sci-fi in feel.
This technique also opens up conceptual possibilities: multiplicity, identity, introspection, even the passage of time or eternity. For artistic or editorial projects, it can deliver strong symbolic content. You can further enhance the effect by experimenting with lighting between the mirrors, LEDs, neon lights, or colored spotlights work especially well, to accentuate depth or highlight specific repetitions, giving the image a modern, futuristic vibe.
In post production, the infinite effect can be enhanced by adjusting contrast and clarity, or even digitally duplicating certain reflections for added impact. You can also remove distracting elements like the camera reflection, unwanted objects, or edge distortions. It’s important to maintain balance: the goal is to impress without overwhelming. Using two mirrors isn’t just a visual trick, it’s an invitation to think in layers, depth, and narrative beyond the immediate frame. Mastering this technique shows your ability to transform a simple scene into a composition with real visual and conceptual dimension.

6. Try taking some black and white self portraits
Black and white photography is one of the most powerful ways to convey emotion, and applying it to mirror self portraits can create deeply expressive and timeless images. By removing color, you emphasize the interplay of light, shadow, texture, and contrast, directing the viewer’s attention to composition, expression, and atmosphere. For photographers looking to move beyond the superficial and explore a more intimate or conceptual side, black and white is an exceptional tool.
When working with this technique, lighting is key. Side lighting or “Rembrandt” lightingl, a lateral source that produces a small triangular shadow under the opposite eye, works beautifully to add depth to the face. You can also experiment with hard light for pronounced shadows and more drama, or soft light for a nostalgic or melancholic feel. The essential point is that every light direction is intentional: in black and white, each shadow tells a story.
In this context, the mirror becomes more than a simple reflection; it’s a point of introspection. Use it to capture genuine expressions, gazes that drift out of frame, or gestures that convey vulnerability, strength, or mystery. Without relying on color, you can explore a much richer range of emotions. Background details or simple visual elements, like a worn wall, delicate curtains, or steam on the mirror, can add texture and context to the image.
For post production, it’s advisable to start by editing in color before converting to black and white. This gives you greater control over tonal channels. Carefully adjust contrast, levels, and clarity to ensure shadows and highlights are well defined without losing detail. Adding a touch of grain can give a classic or cinematic finish. Mirror self portraits in black and white are not only visually striking but also allow you to showcase a more reflective and mature side of your photography. Done with intention, this technique can leave a profound and lasting impression on the viewer.

7. Capture movement in front of the mirror
Incorporating movement into a mirror photo can elevate a static image into a lively, dynamic, and emotionally charged scene. Whether it’s a head turn, hair in motion, a floating garment, or a spontaneous body gesture, movement adds narrative and energy. Instead of capturing just a perfect pose, this technique shows a transitional moment, creating a sense of naturalness, authenticity, and flow. For photographers, it’s an opportunity to explore time as a visual element within the frame.
A simple yet effective way to achieve this is to have your subject perform a repeated, gentle movement, slowly turning, walking in front of the mirror, or flipping their hair. Use a slightly slower shutter speed (around 1/30 to 1/60 seconds) to capture motion trails without losing the subject’s definition entirely. If you have strong lighting or use flash, you can mix freeze and blur: a sharply defined body surrounded by a halo of motion, which produces a striking effect.
Another creative approach is to capture movement outside the mirror while keeping the reflection more still, or vice versa. This contrast draws the eye: one part of the image seems frozen in time, while the other transforms. You can also experiment with independently moving elements like curtains swaying in the breeze, falling water, smoke, or even a flickering candle. The mirror reflects this dynamism, allowing you to use it as a narrative or atmospheric tool.
In post production, enhance the sense of movement by emphasizing blur, selectively lowering clarity, or accentuating directional lines created by the motion. Converting the image to black and white can focus attention on form and flow, or you can use local adjustments to guide the viewer’s gaze to key areas. Motion in mirror photography breaks the rigidity typical of self portraits, demonstrating both technical skill and artistic sensitivity. When captured with intention, even a simple reflection can tell a visually compelling story full of emotion and presence.

8. Take a photo of the mirror from outside the frame
A completely unconventional technique is to use a mirror without showing it in the frame, that is, capturing only the subject’s reflection without including the mirror’s edges or frame. This creates a visually intriguing effect: the viewer sees the subject but doesn’t immediately understand from where the image was taken. The result feels almost cinematic, opening the door to more conceptual, mysterious, and sophisticated compositions.
To achieve this, precise positioning is essential. Ideally, the mirror is placed to the side, on the floor, or even on the ceiling, completely out of the camera’s direct line of sight. The subject stands in front of the mirror, and the camera captures only their reflection from an angle that hides the mirror itself. This often requires several framing trials and perspective adjustments. Small, movable mirrors are particularly handy for this approach, as they can be repositioned on desks, shelves, or other surfaces to find the perfect angle.
This style adds strong narrative value. You can depict the subject in their environment but from an unexpected perspective. A contemplative gaze looking past the camera, or an intimate gesture captured subtly, transforms the mirror into an “invisible” storytelling tool. Playing with what’s revealed and what’s hidden gives the photo a deeply artistic quality, evoking introspection, melancholy, or even voyeuristic tension.
In post production, you can enhance the effect with careful cropping, subtle vignetting, and balanced color adjustments to direct focus to the reflection. Tone grading can be used to harmonize the image, creating either a soft, delicate palette or high contrast drama depending on your concept. Shooting “from outside the mirror” demonstrates not only creativity but also technical mastery and narrative vision. It’s an elegant way to leverage existing resources to create something unexpected, intimate, and full of intention.

9. Experiment with fragmented or broken reflections
Broken or fragmented mirrors offer a unique opportunity to create images with strong visual impact and emotional depth. Rather than presenting a clean, conventional reflection, you can experiment with distortion, repetition, and subject segmentation to craft more conceptual compositions. This type of photography encourages viewers to look twice, question what they see, and discover beauty in imperfection. Using broken mirrors is also an effective way to explore themes such as fragility, duality, and transformation.
To achieve this effect, you can work with a cracked mirror, mirror fragments arranged on a surface, or even small handheld pieces. Each fragment will reflect a different part of your subject, allowing you to create almost abstract, fragmented images that spark curiosity. Pay close attention to how reflections align and which parts of the body or face appear in each segment. You can multiply a single gaze or break an expression into pieces, generating multiple layers of meaning.
From a technical standpoint, this style of photography demands careful lighting. Irregular surfaces can produce harsh reflections or flares that are difficult to control. Soft, side lighting is ideal, as it emphasizes the texture of the mirror without creating excessive glare. The background is equally important: a clean or deliberately chaotic environment can reinforce the visual message. Handle fragments with care—especially when working with models—protecting sharp edges and preventing accidents.
Post processing opens many creative possibilities. You can adjust contrast to accentuate the mirror’s edges, apply black and white toning for a more dramatic feel, or even experiment with digital collage techniques for an even more artistic outcome. Fragmented reflections not only enrich the visual composition but also allow you to convey complex emotions and produce photographs that invite reflection. When executed thoughtfully, this technique can become a signature element of a portfolio with conceptual depth and a distinct visual style.

10. Add post-production effects for an artistic touch
One of the advantages of working with mirror photography is how wonderfully it lends itself to creative post production. Far from being limited to what your lens captures, you can transform a simple image into an artistic piece using effects, retouching, and digital adjustments with intention. This doesn’t mean overloading your photo with filters; rather, it’s about applying tools with photographic judgment to enhance the aesthetic, concept, and visual impact of your image.
A simple but effective technique is to play with additional reflections, duplicating or rotating parts of the image to create surreal symmetries. You can also adjust tones and colors to evoke different emotions: warm hues for a nostalgic feel, cool tones for introspection, or a pastel palette for a soft, dreamlike look. Tools like Adobe Lightroom or Photoshop allow you to control every aspect of light, texture, and color, making your editing an extension of your personal photographic style.
Another powerful approach is incorporating textures, overlays, or creative blur effects. You can add artificial light reflections, lens flares, or even simulate condensation on the mirror for a more intimate atmosphere. Additionally, transparency effects or “shattered glass” overlays work well if you didn’t shoot with actual fragments. These techniques are particularly effective for achieving an editorial or artistic aesthetic, allowing you to create unique images without being entirely dependent on the physical environment where you shot.
That said, it’s crucial that editing serves the image, not the other way around. Before opening any software, ask yourself what you want the photograph to communicate. Should it feel nostalgic, provocative, or dreamlike? With a clear goal in mind, every adjustment you make gains purpose. Post production isn’t just about correcting mistakes, it’s about amplifying the creative intent behind your photograph. In mirror images, where the line between reality and reflection is already blurred, thoughtful artistic editing can be the key to producing memorable, personal, and distinctive photographs.

How to get creative with your mirror photos
Exploring new ways to photograph yourself in the mirror not only sparks your creativity but also helps strengthen your photographic vision and tell more powerful visual stories. As you’ve seen in this article, a mirror can be much more than a decorative accessory: it’s an expressive tool capable of multiplying perspectives, playing with light, and creating compositions filled with intention. Whether you work with natural light, post production effects, or fragmented reflections, the key is to experiment, make mistakes, adjust, and keep creating. This is the essence of artistic growth.
If this topic has inspired you to explore self portraiture from a deeper, more emotional perspective, we recommend the course “Autorretrato con Salem Mc Bunny“, available on our Master Class Photographers platform. There, you’ll learn techniques to craft authentic self portraits that go beyond the purely aesthetic. And if you want to continue expanding your knowledge, we invite you to explore more articles on our blog, where you’ll find inspiration, practical tips, and specialized guides to enhance your skills behind the lens. The mirror is just the beginning. Are you ready to discover everything you can create?


